What is Shock Pulse Method?

Shock Pulse Signals and Vibration
Shock Pulse Phase
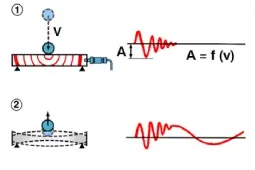
When two pieces of metal, in motion, contact each other two interrelated yet distinct processes occur. On initial impact a shock or pressure wave develops and quickly propagates through the metal. This Shock Pulse is in the ultrasonic frequency band and typically occurs around a center frequency of 36 kilohertz. The amplitude of the Shock Pulse is relative to the velocity of the impact. As the signal expands from its point of origin, it is dissipated by carbon and other imperfections in the metal. This shock or pressure wave is what we are interested in measuring using the Shock Pulse Method.
Vibration Phase
As the impact continues to develop, the metal surfaces are compressed and deflected. As the objects recoil, the metal components then rebound and continue to flex for a number of cycles until the energy is dissipated. This second phase of the collision is vibration and its frequency depends on the shape, mass, stiffness, and dampening of the metal. Shock Pulse Method filters out this phase of the collision, as the magnitude of the vibration is structure and material dependent.
Measuring Shock Pulse Signals
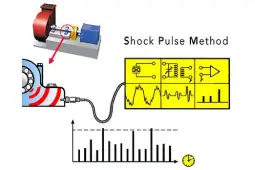
To measure Shock Pulse we use filtering combined with a special Accelerometer, which is designed with specific characteristics for Shock Pulse Measurements. If designed properly, this same accelerometer can be used to measure normal vibration signals as well.
Step:1 Amplification
Shock Pulse signals are relatively small in amplitude and do not travel great distances. To amplify the small Shock Pulse signal the piezo electric crystal stacks, which are the actual element in an accelerometer that generates signals, are constructed in such a fashion that they are excited by the 36 kilohertz Shock Pulses. The Tandem-Piezo accelerometer uses a patented design, which enables the accelerometer to accurately measure both Shock Pulse and Vibration. The Tandem-Piezo design is unique in our industry and provides many advantages over other compression or shear type accelerometers.
Step 2 - Filtering
To distinguish the Shock vibration a band pass filter around the 36- kilohertz Shock Pulse signal is used. This helps isolate the Shock Pulse from other interference created by machinery vibrations.
Step 3 - Conversion to Pulses
The last stage of signal processing is the conversion from a waveform to analog pulses. This process provides a signal that can then be processed to determine bearing condition.
Bearing Condition
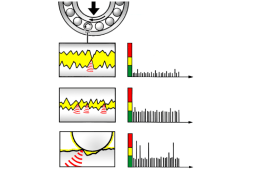
Shock Pulse is actually two readings. Carpet Value and Max Value. The following paragraphs will explain how each reading is derived.
Carpet Value (Lubrication Condition)
Metal impacting metal always occurs in rolling element bearings. Even a new bearing under normal operating conditions starts its journey towards wearing out. If lubrication were perfect, bearings would never wear out. When there is no damage to the bearing, the metal-to-metal contact creates a background noise of Shock Pulse. This is referred to as the Carpet Value. When the lubrication begins to break down there is more metal-to-metal contact and the Carpet Value will reflect this by increasing. This increase tells one that the bearing is experiencing more metal strikes in a given time frame. The most likely cause of increasing Carpet Value is a decrease in the protective properties of the bearing lubrication.
Max Value (Bearing Damage)
When a defect occurs on a bearing element, it is periodically hit by another element in the bearing. For example, a defect on the outer raceway of a bearing is hit each time a ball or roller passes over the defect. This periodic collision creates a high amplitude burst of Shock Pulse waves that stands above the carpet value. It is similar to hitting a pothole with your car. This stands out above the normal road noise. With the application of some peak hold signal processing, we can distinguish this peak from the carpet of background Shock Pulse signal. As bearing damage first develops then propagates the Max Value increases. Max Value thereby is an excellent indicator of damage in rolling element bearings.
Variable Speed Equipment
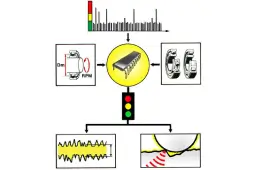
Understanding that Shock Pulse is a combination of amplitude and density of metal-to-metal strikes is important when considering variable speed machinery or a bearing of a different diameter. As a machine runs faster, the density and amplitude of the metal-to-metal strikes will increase as well. The result is that both Max Value and Carpet Value Shock Pulse readings will increase and decrease as speed increases and decreases. To correct for this, one inputs both the shaft (bearing) diameter and the RPM of the machine into the Shock Pulse measurement device. The Shock Pulse meter then calculates an index number and applies it to the raw Shock Pulse signal. The result is a normalized Shock Pulse reading that can be compared from machine to machine. This essential element sets Shock Pulse apart as a reliable gauge of machinery condition. Trends for both lubrication condition and bearing damage are clearly visible despite variable speed equipment. These trends enable one to gauge how quickly the problem is propagating. Standardized warning and alarm levels are applied to normalized carpet and max values to give advanced warning of lubrication problems and bearing damage.
Other Applications
Shock Pulse is not limited to determining the condition of rolling element bearings. Any piece of machinery with continuous metal-to-metal contact gives off Shock Pulse signals. Equipment such as gearboxes, lobe compressors, screw compressors, and centrifuges all give off Shock Pulse signals and can be effectively monitored using Shock Pulse. The capacity of this reading to measure lubrication condition and damage makes it one of the most popular measurements of machinery condition in the world.


